face_video_recognition

流程

    本节总结下初步完成人脸动作检测登录的流程:
        用户进入登录界面
      ->点击面部动作检测登录
      ->用户点击start开启摄像头
      ->待人脸进入摄像头范围,点击Start Recording开始录像
      ->在2s录像中完成动作(初步是完成眨眼两次检测),前端自动上传该2s视频
      ->后台根据前端传来的数据,进行解析,获得结果后传回前端
      ->前端接收返回结果,成功,则跳转进入系统;失败则要求用户重新登录
    注:旁边的play按钮方便用户查看上传到服务端的2s视频

实现

前端解读

  在用户模板页面添加显示标签和点击按钮

1
2
3
4
5
6
7
8
<video id="gum" playsinline autoplay muted></video>
<video id="recorded" playsinline loop></video>

<div>
<button id="start">Start camera</button>
<button id="record" disabled>Start Recording</button>
<button id="play" disabled>Play</button>
</div>

  接下来是前端的js代码,我们基于的是webrtc官网的参考代码
点击显/隐完整js代码
录制视频自动上传
1
2
3
4
5
6
7
8
9
10
11
12
13
14
15
16
17
18
19
20
21
22
23
24
25
26
27
28
29
30
31
32
33
34
35
36
37
38
39
40
41
42
43
44
45
46
47
48
49
50
51
52
53
54
55
56
57
58
59
60
61
62
63
64
65
66
67
68
69
70
71
72
73
74
75
76
77
78
79
80
81
82
83
84
85
86
87
88
89
90
91
92
93
94
95
96
97
98
99
100
101
102
103
104
105
106
107
108
109
110
111
112
113
114
115
116
117
118
119
120
121
122
123
124
125
126
127
128
129
130
131
132
133
134
135
136
137
138
139
140
141
142
143
144
145
146
147
148
149
150
'use strict';
/ globals MediaRecorder /
//const mediaSource = new MediaSource();
//mediaSource.addEventListener('sourceopen', handleSourceOpen, false);
let mediaRecorder;
let recordedBlobs;
let sourceBuffer;

const errorMsgElement = document.querySelector('span#errorMsg');
const recordedVideo = document.querySelector('video#recorded');
const recordButton = document.querySelector('button#record');
recordButton.addEventListener('click', () => {
if (recordButton.textContent === 'Start Recording') {
startRecording();
} else {
stopRecording();
recordButton.textContent = 'Start Recording';
playButton.disabled = false;
}
});

const playButton = document.querySelector('button#play');
playButton.addEventListener('click', () => {
const superBuffer = new Blob(recordedBlobs, {type: 'video/webm'});
recordedVideo.src = null;
recordedVideo.srcObject = null;
recordedVideo.src = window.URL.createObjectURL(superBuffer);
recordedVideo.controls = true;
recordedVideo.play();
});


function handleDataAvailable(event) {
if (event.data && event.data.size > 0 && mediaRecorder.state != 'inactive') {
console.log('event.data', event.data);
console.log('———————————————————–');
recordedBlobs.push(event.data);
recordButton.click();
var formData = new FormData();
//formData.append('video-filename', file.name);
formData.append("faceVideo", event.data);
//console.log('file:', file);
jQuery.ajax({
type:"POST",
url:"/face/test/",
//必须添加 csrf_token
contentType:"video/webm",
data:formData,
dataType: "json",
cache: false,//上传文件无需缓存
processData: false, // 告诉jQuery不要去处理发送的数据
contentType: false, // 告诉jQuery不要去设置Content-Type请求头

success:function (displayList) {
<!–// 处理认证后的数据–>
if (displayList.canLogin === true){
alert("验证成功!");
alert('Blinks:' + displayList.blink_num);
alert(displayList.AuthName);
window.location.href='/accounts/profile/';
}
else{
alert("验证失败!");
alert(displayList.blink_num);
}
},
error:function () {
alert("验证失败: 未检测到人脸!");
<!–DisplayNo1.text("验证失败: 未检测到人脸").removeClass("label-success").addClass("label-danger");–>
}
})
}
}

function startRecording() {
recordedBlobs = [];
let options = {mimeType: 'video/webm;codecs=vp9'};
if (!MediaRecorder.isTypeSupported(options.mimeType)) {
console.error($&#123;options.mimeType&#125; is not Supported);
errorMsgElement.innerHTML = $&#123;options.mimeType&#125; is not Supported;
options = {mimeType: 'video/webm;codecs=vp8'};
if (!MediaRecorder.isTypeSupported(options.mimeType)) {
console.error($&#123;options.mimeType&#125; is not Supported);
errorMsgElement.innerHTML = $&#123;options.mimeType&#125; is not Supported;
options = {mimeType: 'video/webm'};
if (!MediaRecorder.isTypeSupported(options.mimeType)) {
console.error($&#123;options.mimeType&#125; is not Supported);
errorMsgElement.innerHTML = $&#123;options.mimeType&#125; is not Supported;
options = {mimeType: ''};
}
}
}

try {
mediaRecorder = new MediaRecorder(window.stream, options);
} catch (e) {
console.error('Exception while creating MediaRecorder:', e);
errorMsgElement.innerHTML = Exception while creating MediaRecorder: $&#123;JSON.stringify(e)&#125;;
return;
}

console.log('Created MediaRecorder', mediaRecorder, 'with options', options);
recordButton.textContent = 'Uploading…';
playButton.disabled = true;
mediaRecorder.onstop = (event) => {
console.log('Recorder stopped: ', event);
};
mediaRecorder.ondataavailable = handleDataAvailable;
mediaRecorder.start(2000); // collect 10ms of data
console.log('MediaRecorder started', mediaRecorder);
//recordButton.click();
}

function stopRecording() {
mediaRecorder.stop();
console.log('Recorded Blobs: ', recordedBlobs);
}

function handleSuccess(stream) {
recordButton.disabled = false;
console.log('getUserMedia() got stream:', stream);
window.stream = stream;

const gumVideo = document.querySelector('video#gum');
gumVideo.srcObject = stream;
}

async function init(constraints) {
try {
const stream = await navigator.mediaDevices.getUserMedia(constraints);
handleSuccess(stream);
} catch (e) {
console.error('navigator.getUserMedia error:', e);
errorMsgElement.innerHTML = navigator.getUserMedia error:$&#123;e.toString()&#125;;
}
}

document.querySelector('button#start').addEventListener('click', async () => {
const hasEchoCancellation = document.querySelector('#echoCancellation').checked;
const constraints = {
audio: {
echoCancellation: {exact: hasEchoCancellation}
},
video: {
width: 1280, height: 720
}
};
console.log('Using media constraints:', constraints);
await init(constraints);
});

  在这里,主要是几个函数,涉及的中心是对MediaRecorder接口的应用,我会一一进行讲解
1
2
3
4
5
6
7
8
9
10
11
12
13
14
15
16
let mediaRecorder;
let recordedBlobs;
let sourceBuffer;

const errorMsgElement = document.querySelector('span#errorMsg');
const recordedVideo = document.querySelector('video#recorded');
const recordButton = document.querySelector('button#record');
recordButton.addEventListener('click', () => {
if (recordButton.textContent === 'Start Recording') {
startRecording();
} else {
stopRecording();
recordButton.textContent = 'Start Recording';
playButton.disabled = false;
}
});

  这里是获取页面元素及对record按钮的点击事件进行处理,对每一次record点击,显示在“Start Recording”和“loading”间切换,在Start Record前,将play按钮设置为点击无效
1
2
3
4
5
6
7
8
9
const playButton = document.querySelector('button#play');
playButton.addEventListener('click', () => {
const superBuffer = new Blob(recordedBlobs, {type: 'video/webm'});
recordedVideo.src = null;
recordedVideo.srcObject = null;
recordedVideo.src = window.URL.createObjectURL(superBuffer);
recordedVideo.controls = true;
recordedVideo.play();
});

  这里是对播放按钮的点击事件进行处理,这里是将获取到的recordedBlobs流处理对象赋值给新的Blob流处理对象,并作为视频源url赋值给recordedVideo元素,这样recordedVideo元素就能播放刚刚录制的视频了(关于Blob的更多描述,可以参看其官网)
  接下来四个函数是对点击按钮record后视频录制的处理
1
2
3
4
5
6
7
8
9
10
11
12
13
14
15
16
17
18
19
20
21
22
23
24
25
26
27
28
29
30
31
32
33
34
35
36
37
38
39
40
41
function handleDataAvailable(event) {
if (event.data && event.data.size > 0 && mediaRecorder.state != 'inactive') {
console.log('event.data', event.data);
console.log('-----------------------------------------------------------');
recordedBlobs.push(event.data);
recordButton.click();
var formData = new FormData();
//formData.append('video-filename', file.name);
formData.append("faceVideo", event.data);
//console.log('file:', file);
jQuery.ajax({
type:"POST",
url:"/face/test/",
//必须添加 csrf_token
contentType:"video/webm",
data:formData,
dataType: "json",
cache: false,//上传文件无需缓存
processData: false, // 告诉jQuery不要去处理发送的数据
contentType: false, // 告诉jQuery不要去设置Content-Type请求头

success:function (displayList) {
<!--// 处理认证后的数据-->
if (displayList.canLogin === true){
alert("验证成功!");
alert('Blinks:' + displayList.blink_num);
alert(displayList.AuthName);
window.location.href='/accounts/profile/';
}
else{
alert("验证失败!");
alert(displayList.blink_num);
}
},
error:function () {
alert("验证失败: 未检测到人脸!");
<!--DisplayNo1.text("验证失败: 未检测到人脸").removeClass("label-success").addClass("label-danger");-->
}
})
}
}

  该函数是对mediaRecorder.ondataavailable事件的处理,主要触发情况有两个,一个是我们设定的录制时间到了,一个是我们触发了 MediaRecorder.stop()事件,此时,会传进一个event对象,里面的data就是我们录制的视频数据,我们可以通过formData.append()封装数据,用ajax传至后台,在后台通过request.File[]可以获取到该视频录制数据
1
2
3
4
5
6
7
8
9
10
11
12
13
14
15
16
17
18
19
20
21
22
23
24
25
26
27
28
29
30
31
32
33
34
35
36
37
38
function startRecording() {
recordedBlobs = [];
let options = {mimeType: 'video/webm;codecs=vp9'};
if (!MediaRecorder.isTypeSupported(options.mimeType)) {
console.error(`${options.mimeType} is not Supported`);
errorMsgElement.innerHTML = `${options.mimeType} is not Supported`;
options = {mimeType: 'video/webm;codecs=vp8'};
if (!MediaRecorder.isTypeSupported(options.mimeType)) {
console.error(`${options.mimeType} is not Supported`);
errorMsgElement.innerHTML = `${options.mimeType} is not Supported`;
options = {mimeType: 'video/webm'};
if (!MediaRecorder.isTypeSupported(options.mimeType)) {
console.error(`${options.mimeType} is not Supported`);
errorMsgElement.innerHTML = `${options.mimeType} is not Supported`;
options = {mimeType: ''};
}
}
}

try {
mediaRecorder = new MediaRecorder(window.stream, options);
} catch (e) {
console.error('Exception while creating MediaRecorder:', e);
errorMsgElement.innerHTML = `Exception while creating MediaRecorder: ${JSON.stringify(e)}`;
return;
}

console.log('Created MediaRecorder', mediaRecorder, 'with options', options);
recordButton.textContent = 'Uploading...';
playButton.disabled = true;
mediaRecorder.onstop = (event) => {
console.log('Recorder stopped: ', event);
};
mediaRecorder.ondataavailable = handleDataAvailable;
mediaRecorder.start(2000); // collect 10ms of data
console.log('MediaRecorder started', mediaRecorder);
//recordButton.click();
}

  这里是我们开始视频录制的函数,首先,我们通过MediaRecorder.isTypeSupported可以查询到我们的浏览器是否支持webrtc所需的编解码(编解码是由浏览器提供的),webrtc默认的video是webm格式,获取到编码类型后我们新建MediaRecorder对象,传入的参数window.stream是我们一会儿通过navigator.mediaDevices.getUserMedia获取到的,也就是我们主机媒体设备的媒体流,将play按钮设置为点击有效,改变reord按钮的显示文本,设置mediaRecorder.onstop事件的处理程序,设置mediaRecorder.ondataavailable的处理程序,mediaRecorder.start(2000)设置我们的录制时间为2s
  注:这里所有的console.log是为了方便我们在浏览器的console界面进行运行变量观察
1
2
3
4
function stopRecording() {
mediaRecorder.stop();
console.log('Recorded Blobs: ', recordedBlobs);
}

  这个函数是当record按钮在“Loading”状态点击时调用的函数,它会调用mediaRecorder.stop()函数,并触发mediaRecorder.ondataavailable事件
1
2
3
4
5
6
7
8
function handleSuccess(stream) {
recordButton.disabled = false;
console.log('getUserMedia() got stream:', stream);
window.stream = stream;

const gumVideo = document.querySelector('video#gum');
gumVideo.srcObject = stream;
}

  成功获得用户许可拿到媒体流后的处理函数,开启record按钮点击有效,将获得的媒体流stream赋值给window.stream方便后面将流数据记录,同时对gum元素赋值,用来将媒体流实时显示
  接下来的两个函数,是对用户点击Start按钮后获取webcam媒体流的初始化处理;
1
2
3
4
5
6
7
8
9
async function init(constraints) {
try {
const stream = await navigator.mediaDevices.getUserMedia(constraints);
handleSuccess(stream);
} catch (e) {
console.error('navigator.getUserMedia error:', e);
errorMsgElement.innerHTML = `navigator.getUserMedia error:${e.toString()}`;
}
}

  该初始化函数询问用户来获取媒体流权限,前面声明async来说明这是一个异步函数,函数中的await会使函数暂停执行,等待Promise的结果出来,若成功获取媒体流权限,则将媒体流传入handleSuccess函数,进行下一步处理;反之,对errorMsgElement元素赋值来显示错误信息
1
2
3
4
5
6
7
8
9
10
11
12
13
document.querySelector('button#start').addEventListener('click', async () => {
const hasEchoCancellation = document.querySelector('#echoCancellation').checked;
const constraints = {
audio: {
echoCancellation: {exact: hasEchoCancellation}
},
video: {
width: 1280, height: 720
}
};
console.log('Using media constraints:', constraints);
await init(constraints);
});

  当用户点击Start按钮后,触发该async调用,在这里设置对媒体流的约束变量constraints,然后传入并调用init函数,等待用户赋予媒体流权限

后台解读

views.py中处理此功能的代码
1
2
3
4
5
6
7
8
9
10
11
12
13
14
15
16
17
18
19
20
21
22
23
24
25
26
27
28
29
30
31
32
33
34
35
36
37
38
39
40
41
42
43
44
45
46
47
48
49
50
51
52
53
54
55
56
57
58
59
60
61
62
63
64
65
66
67
68
69
70
71
72
73
74
75
76
77
78
79
80
81
82
83
84
85
86
87
88
89
90
91
92
93
94
95
96
97
98
99
100
101
102
103
104
105
106
107
108
109
110
111
112
113
114
115
116
117
118
119
@csrf_exempt
def test(request):
if request.method == "POST":
start = time.clock()
videos = request.FILES['faceVideo']
fileName = 'temp.webm'
# file = uploadedfile.File(videos)
with open(fileName, 'wb') as f:
for chunk in videos.chunks():
f.write(chunk)
end = time.clock()
print("video_get_write:", end - start)

start = time.clock()
num = detection_blink()
end = time.clock()
print("Blink_video_stream:", end - start)

files = glob.glob(os.path.join('.', ".jpg"))
imgName = files[int(len(files) / 2)]
jsonInfo = auth_user(imgName)
os.system('del .mp4 .webm .npy')
JsonBackInfo = {
"canLogin": jsonInfo['canLogin'],
"AuthName": jsonInfo['AuthName'],
'blink_num': num
}

if jsonInfo['AuthName'] != "未授权用户" and num == 2:
user = User.objects.get_by_natural_key(username=jsonInfo['AuthName']) # authenticate(username='admin', password='123456')
if user is not None:
if user.is_active:
ori_login(request, user)

return JsonResponse(JsonBackInfo)
else:
return render(request, 'test.html')


def eye_aspect_ratio(eye):
point0 = eye[0]
point1 = eye[1]
point2 = eye[2]
point3 = eye[3]
point4 = eye[4]
point5 = eye[5]
temp = math.pow(point1[0] - point5[0], 2), math.pow(point1[1] - point5[1], 2)
distance1 = math.sqrt(math.fsum(temp))
temp = math.pow(point2[0] - point4[0], 2), math.pow(point2[1] - point4[1], 2)
distance2 = math.sqrt(math.fsum(temp))
temp = math.pow(point0[0] - point3[0], 2), math.pow(point0[1] - point3[1], 2)
distance3 = math.sqrt(math.fsum(temp))
return (distance1 + distance2) / (2 distance3)


def video2frame(videofile):
# 读取视频
cap = cv2.VideoCapture(videofile)
# 获取FPS(每秒传输帧数(Frames Per Second))
fps = cap.get(cv2.CAP_PROP_FPS)
# 获取总帧数
totalFrameNumber = cap.get(cv2.CAP_PROP_FRAME_COUNT)
print(fps)
print(totalFrameNumber)
# 当前读取到第几帧
COUNT = 0

# 若小于总帧数则读一帧图像
while COUNT < totalFrameNumber:
# 一帧一帧图像读取
ret, frame = cap.read()
# 把每一帧图像保存成jpg格式(这一行可以根据需要选择保留)
cv2.imwrite(str(COUNT).zfill(3) + '.jpg', frame)
# 显示这一帧地图像
# cv2.imshow('video', frame)
COUNT = COUNT + 1
# 延时一段33ms(1s➗30帧)再读取下一帧,如果没有这一句便无法正常显示视频
cv2.waitKey(33)

cap.release();


def translate(infile, outfile):
ff = ffmpy3.FFmpeg(
inputs={infile: None},
outputs={outfile: '-r 25 -y'}
)
ff.run()


def detection_blink():
num = 0
left_blink, right_blink = (False, False)
infile = 'temp.webm'
outfile = 'temp.mp4'
translate(infile, outfile)
video2frame(outfile)

files = glob.glob(os.path.join('.', ".jpg"))
for f in files:
unknown_face = face_recognition.load_image_file(f)
locate_unknown_face = face_recognition.face_locations(unknown_face)
landmards = face_recognition.face_landmarks(unknown_face, locate_unknown_face)
left_eye = landmards[0]['left_eye']
right_eye = landmards[0]['right_eye']
left_ear = eye_aspect_ratio(left_eye)
right_ear = eye_aspect_ratio(right_eye)

if left_ear < 0.20:
left_blink = True
if right_ear < 0.20:
right_blink = True

if left_ear >= 0.20 and right_ear >= 0.20 and left_blink and right_blink:
num += 1
right_blink = False
left_blink = False

return num

  这里涉及ffmpy3、cv2、face_recognition等对媒体文件进行处理的包,其中ffmpy3是基于ffmpeg工具,我们需要预先对其安装,可去官网下载
  我们在这里将该部分功能拆分为5个函数,对眨眼检测的总体处理流程是:首先从前端获取用户视频,用ffmpeg将视频解析为每秒25帧的图片集,对每帧图片检测其中人脸的68个标记点
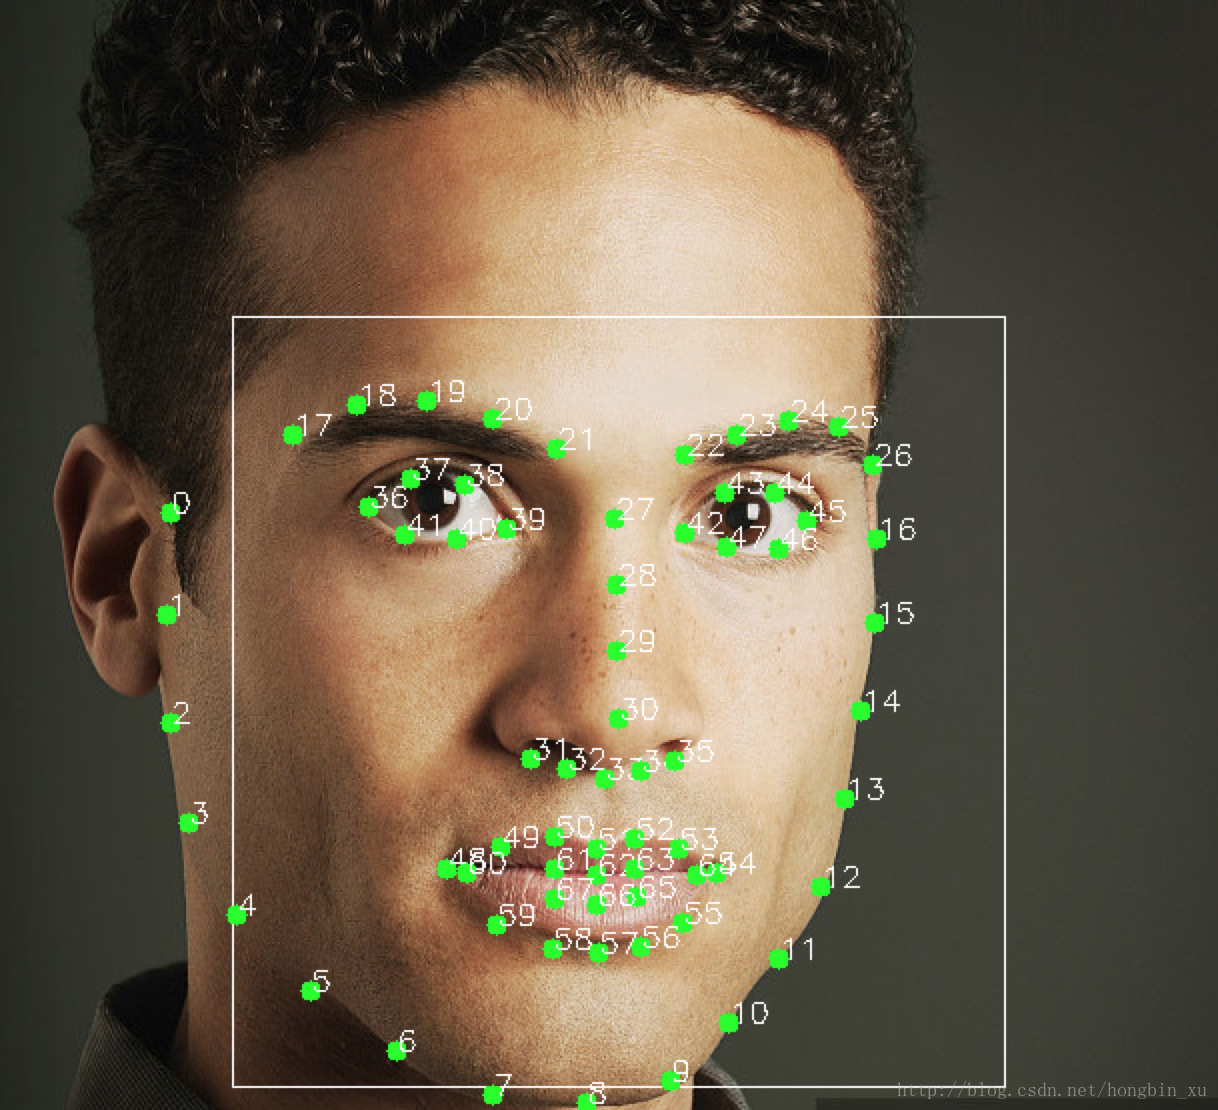
  根据参考论文中的描述眼睛纵横比(eye aspect ratio (EAR))的概念,可以取出68个标记点的左右眼部分,计算眼睛纵横比,设定一个阈值,将ear值与阈值对比,大于阈值判断眼睛为睁开状态,反之则判断为闭眼状态,最后顺序处理每张图片的眼睛状态来获得总共的眨眼次数

1
2
3
4
5
6
7
8
9
10
11
12
13
14
15
16
17
18
19
20
21
22
23
24
25
26
27
28
29
30
31
32
33
34
35
36
37
@csrf_exempt
def test(request):
if request.method == "POST":
start = time.clock()
videos = request.FILES['faceVideo']
fileName = 'temp.webm'
# file = uploadedfile.File(videos)
with open(fileName, 'wb') as f:
for chunk in videos.chunks():
f.write(chunk)
end = time.clock()
print("video_get_write:", end - start)

start = time.clock()
num = detection_blink()
end = time.clock()
print("Blink_video_stream:", end - start)

files = glob.glob(os.path.join('.', "*.jpg"))
imgName = files[int(len(files) / 2)]
jsonInfo = auth_user(imgName)
os.system('del *.mp4 *.webm *.npy')
JsonBackInfo = {
"canLogin": jsonInfo['canLogin'],
"AuthName": jsonInfo['AuthName'],
'blink_num': num
}

if jsonInfo['AuthName'] != "未授权用户" and num == 2:
user = User.objects.get_by_natural_key(username=jsonInfo['AuthName']) # authenticate(username='admin', password='123456')
if user is not None:
if user.is_active:
ori_login(request, user)

return JsonResponse(JsonBackInfo)
else:
return render(request, 'test.html')

  该函数前面的装饰器csrf_exempt是用来说明访问下面的函数前可以不用csrf_token验证,这是处理眨眼检测请求的主函数,请求为“get”时,渲染眨眼检测模板页面并作为结果返回用户;当请求为“post”时,通过request.FILES[‘faceVideo’]来获取传至后台的媒体文件,为避免因文件过大而无法写入的问题,这里调用UploadFile.chunks()方法读取并用write()将上传文件存入后台文件系统,接下来调用detection_blink()进行眨眼检测,返回眨眼次数存入num,获取视频中间的一帧调用auth_user(imgName)来进行登录用户匹配,构造Json用来返回用户数据
1
2
3
4
5
6
def translate(infile, outfile):
ff = ffmpy3.FFmpeg(
inputs={infile: None},
outputs={outfile: '-r 25 -y'}
)
ff.run()

  该函数用ffmpy3将infile以每秒25帧的帧率转换成outfile,目的是将webrtc的webm视频格式转换为mp4格式,以便opencv提取每一帧的数据(opencv无法解析webm格式)
1
2
3
4
5
6
7
8
9
10
11
12
13
14
15
16
17
18
19
20
21
22
23
24
25
def video2frame(videofile):
# 读取视频
cap = cv2.VideoCapture(videofile)
# 获取FPS(每秒传输帧数(Frames Per Second))
fps = cap.get(cv2.CAP_PROP_FPS)
# 获取总帧数
totalFrameNumber = cap.get(cv2.CAP_PROP_FRAME_COUNT)
print(fps)
print(totalFrameNumber)
# 当前读取到第几帧
COUNT = 0

# 若小于总帧数则读一帧图像
while COUNT < totalFrameNumber:
# 一帧一帧图像读取
ret, frame = cap.read()
# 把每一帧图像保存成jpg格式(这一行可以根据需要选择保留)
cv2.imwrite(str(COUNT).zfill(3) + '.jpg', frame)
# 显示这一帧地图像
# cv2.imshow('video', frame)
COUNT = COUNT + 1
# 延时一段33ms(1s➗30帧)再读取下一帧,如果没有这一句便无法正常显示视频
# cv2.waitKey(33)

cap.release()

  使用cv2将转换后的mp4视频提取出每一帧,保存在本地
1
2
3
4
5
6
7
8
9
10
11
12
13
14
def eye_aspect_ratio(eye):
point0 = eye[0]
point1 = eye[1]
point2 = eye[2]
point3 = eye[3]
point4 = eye[4]
point5 = eye[5]
temp = math.pow(point1[0] - point5[0], 2), math.pow(point1[1] - point5[1], 2)
distance1 = math.sqrt(math.fsum(temp))
temp = math.pow(point2[0] - point4[0], 2), math.pow(point2[1] - point4[1], 2)
distance2 = math.sqrt(math.fsum(temp))
temp = math.pow(point0[0] - point3[0], 2), math.pow(point0[1] - point3[1], 2)
distance3 = math.sqrt(math.fsum(temp))
return (distance1 + distance2) / (2 * distance3)

  传入一只眼睛的6个标记点列表,眼部的标记点如下
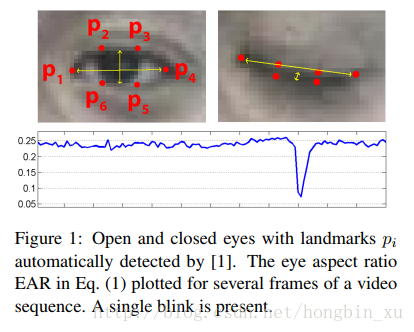
  根据以下公式计算ear值

  返回眼睛的EAR值
1
2
3
4
5
6
7
8
9
10
11
12
13
14
15
16
17
18
19
20
21
22
23
24
25
26
27
28
29
def detection_blink():
num = 0
left_blink, right_blink = (False, False)
infile = 'temp.webm'
outfile = 'temp.mp4'
translate(infile, outfile)
video2frame(outfile)

files = glob.glob(os.path.join('.', "*.jpg"))
for f in files:
unknown_face = face_recognition.load_image_file(f)
locate_unknown_face = face_recognition.face_locations(unknown_face)
landmards = face_recognition.face_landmarks(unknown_face, locate_unknown_face)
left_eye = landmards[0]['left_eye']
right_eye = landmards[0]['right_eye']
left_ear = eye_aspect_ratio(left_eye)
right_ear = eye_aspect_ratio(right_eye)

if left_ear < 0.20:
left_blink = True
if right_ear < 0.20:
right_blink = True

if left_ear >= 0.20 and right_ear >= 0.20 and left_blink and right_blink:
num += 1
right_blink = False
left_blink = False

return num

  该函数整合以上处理函数,调用translate函数将webm转换为mp4格式,调用video2frame将mp4文件转换为帧集,对每一帧数据调用face_recognition.face_locations函数(HOG+SVM)先获得人脸位置,再通过face_recognition.face_landmarks函数,获得该图片中人脸的68个标记点,对于眨眼视频,我们通过检测眨眼瞬间的次数来简单的代表眨眼次数,若两个眼睛的前几帧检测到状态均有闭眼时,当出现一次两只眼睛均睁开的状态时,我们就认为出现了眨眼瞬间,记为一次眨眼,累计眨眼次数并返回给调用函数

注:face_recognition.face_landmarks是调用dlib中的shape_predictor函数,该dlib函数传入的一个参数是姿态检测器路径,有一个68个标记点的姿态检测器是dlib结合CVPR 2014年论文《One Millisecond Face Alignment with an Ensemble of Regression Trees》iBUG 300-W人脸数据集训练得来的,该检测器可通过该url获得

Show comments from Gitment